This post contains affiliate links - using affiliate links from Homeschool Coffee Break helps fuel this blog and our homeschool - thank you!
This week you'll find a round-up of Arts, Crafts, and Projects Ideas over at the Homeschool Review Crew blog, and I've pulled together a few of our favorite art project ideas from the Virtual Refrigerator Art Link-up to contribute. These projects are all fun and relatively easy.
********************************
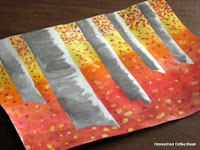
One of our all-time favorite art projects was a series of Birch Grove paintings inspired by the art of Gustav Klimt. All you need to do your own is paper, paint and brushes, and some masking tape.
To start, use masking tape in a couple different sizes. Press the sticky side against a t-shirt to pick up some of the fibers. (This makes it easier to take off without tearing the paper later.) Stick strips of masking tape to watercolor paper, and then paint the background with a wash of watercolors. Oranges, browns, and yellows for an autumn scene; greens for a spring or summer scene; and blues for a winter scene.
Once the wash is dry, dab on smudges and dots of watercolors - more oranges and yellows for autumn leaves; bright floral colors for blossoms or petals; or white and blue or lavender for falling snow. After all the paint is dry, gently peel off the tape.
Shade one side of the tree trunks grey, either with watercolors or water color pencils. Finally, using a fine brush, paint some black or grey markings on the trunks to make them look more like birch bark.
See my original Virtual Fridge post Virtual Refrigerator - Gustav Klimt or Virtual Refrigerator - Birch Groves for more detail and information on Klimt.
********************************
One of Kennady's favorite artists is Piet Mondrian, and this is a simple Mondrian inspired project that she created a few years ago. It could be done by artists of all ages and abilities. (Very young artists should have an adult help them, though!)
Open up a cardboard cereal box and trim the edges, then use a straight edge to draw vertical and horizontal lines on the back of the box. Cut strips of corrugated cardboard and glue them onto the patterns.
Cover the cardboard with heavy duty aluminum foil. Use a glue stick or brush white glue all over the dull side of the foil and then smooth it down over the cardboard. Use a felt square or a washcloth to rub and smooth the foil down so the grid pattern is in relief. Be especially careful not to slice the foil as you press against the cardboard strips. Then use a black permanent marker to color the grid.
Use red, blue, and yellow permanent marker to color in a few of the squares. Use permanent marker, like Sharpie, so that the color doesn't rub off the foil. Even so, be careful where you place your hand, and we recommend giving each color a few minutes to 'set' before doing the next, or touching it.
 |
| Composition in Foil and Marker by KAT, August 2015 |
See my original Virtual Fridge posts Virtual Refrigerator - Piet Mondrian and Virtual Refrigerator - A Mondrian Memory, or my Blogging Through the Alphabet post De Stijl for more details and information about Piet Mondrian.
********************************
This next simple project was done by both Kennady and Landon, when they probably about 8 and 12 years old. For a project imitating Australian Aboriginal dot painting, Landon drew an abstract pattern and Kennady drew a sea turtle. The outlines were sketched lightly in pencil, then they used cotton swabs to dot the acrylic paints into their pattern outlines. We chose mostly earth toned colors, and learned that it was best to use outline pictures of a flower or an animal such as a turtle, lizard, fish, or butterfly.
 |
| Abstract, Aboriginal Dot Painting by Landon |
 |
| Sea Turtle, Aboriginal Dot Painting by KAT |
The original instructions for this project came from Geography Through Art by Sharon Jeffus and Jamie Aramini.
Find out more in the original post Virtual Refrigerator - Australian Aboriginal Dot Painting.

********************************
When studying ancient South and Central American cultures, we wanted to do an Aztec serpent mosaic. My boys did this project when they were little, and a number of years ago Kennady did it as well. It's a pretty easy project for little kids. We searched for an outline drawing to use as our template, but probably should have just drawn our own! First she cut out the serpent outline, leaving a small border. Then she used a black marker to color the border, the spaces between the serpent's coils, and the eyes; and used a red marker for the lips. Then she cut out small squares of tissue paper in two shades of blue, and glued the pieces along the serpent's body. We mounted it on blue construction paper, but black would have been more striking.


Find more details in the original post Virtual Refrigerator - Aztec Serpent Mosaic

********************************
And finally, another art project inspired by central American art that we enjoyed was Amate (pronounced "ah-MAH-tay"). It is a type of paper produced from bark, but can also refer to the style of art painted on that paper. In ancient times, the Aztecs used amate paper to record data or as gifts. Today, Mexican artisans paint birds, plants, and animals in whimsical designs on amate paper.
Here's our simplified version of amate. First, we cut a large rectangle from a brown paper shopping bag, and then crumpled it up and smoothed it back out several times to "soften" its appearance. Then Kennady drew her design with a black sharpie. Then she painted the design using bright colored tempera paints. Traditional amate uses bright tropical colors, or almost neon colors, with white accent. Usually there is no background color.


Find out more in the original post Virtual Refrigerator: Mexican Folk Art - Amate Painting

********************************
I hope you've found some interesting ideas here to try with your kids. Let me know if you create any of these projects, and if you do, please feel free to share them with us on the Virtual Fridge art link-up each Wednesday!
You'll find lots more crafty hands-on ideas when you visit the Homeschool Review Crew blog for the Crafts and Experiements and Projects, Oh My! Round-up, and see what other Crew members are sharing. This will be live on Friday, May 25th.
This post is part of a #breakthrulinkup at Breakthrough Homeschooling - Join us! This post is also linked at the Encouraging Hearts & Home Blog Hop hosted by Apron Strings & Other Things.
©2006-2018 Homeschool Coffee Break. All rights reserved. All text, photographs, artwork, and other content may not be reproduced or transmitted in any form without the written consent of the author. http://kympossibleblog.blogspot.com/
We are a participant in the Amazon Services LLC Associates Program, an affiliate advertising program designed to provide a means for us to earn fees by linking to Amazon.com and affiliated sites.


4 comments:
I love the birch grove ones as well as the turtle!
These are all so great! I love the birch trees.
The amate turned out well didn't it?
I have no idea which of these is my favorite! I really like using tape to create the white space and then removing it. We did something like that for Father's Day last year with "DAD." The one inspired by Mondrian is really cool, too.
Post a Comment
I love comments! It's like visiting over a virtual cup of coffee.